Globalink Support
Help is only a click away. |
|
Globalink Cisco Linksys SPA9000 PBX Setup |
|
|
Linksys
SPA9000 PBX
The SPA9000 marries the rich feature set of
high-end PBX telephone systems with the convenience and cost advantages
of Voice over IP. It has common voice system features such as an
auto-attendant, shared line appearances, three way call conferencing,
intercom, music on hold, call-forwarding and much more. The SPA9000
opens up access to the benefits of VoIP, including low cost long
distance service, telephone number portability, and one network for both
voice and data.
The SPA9000 is so easy to configure that a fully
working system can be set up in minutes. New telephones are
automatically detected and registered when they are connected to the
SPA9000. The SPA9000 has an integrated web server that allow features to
be configured using a web browser. The web server has multiple levels of
password protected access to user and service level features. Service
level settings may be locked by the Internet Telephone Service Provider
to ensure they are not inadvertently corrupted. The Internet Telephone
Service Provider also can remotely update the software and settings
through a secure encrypted connection.
With its integrated router, the SPA9000 can be
either connected directly to the internet connection or to another
router on your network. The SPA9000 has separate WAN and LAN Ethernet
ports. The WAN connection can be connect through DHCP or a fixed IP
address. The LAN port can assign IP addresses to IP Phones and computers
using NAT and DHCP.
While the SPA9000 will work with any SIP
compatible IP Phone, it is the ideal host for Linksys IP Phones, such as
the SPA901, SPA921, SPA922, SPA941, and SPA942. Powerful configuration
capabilities enable the SPA9000 to support a greater set of advanced
features with these IP Phones, such as shared line appearances, hunt
groups, call transfer, call parking lot, and group paging. With its two
FXS ports, the SPA9000 can support traditional analog devices such as
telephones, answering machines, FAX machines, and media adapters.
|
|
STEP 1: Connecting
to the Internet
Connect the
ethernet cable from your PC to the ethernet port of the
SPA 9000. Then connect your cable or DSL modem's
ethernet cable to the router's Internet port. Now, power
up your PC, cable and DSL modem and your router.
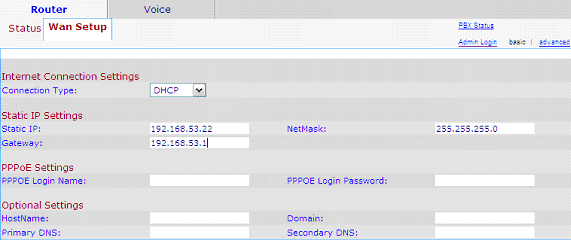
Open you web
browser and enter 192.168.0.1/admin/advanced
. Click on the ROUTER tab and then the WAN Setup tab.
The possible Internet connection types are:
- DHCP
- Static IP
- PPPoE
- MAC
Address Clone Configuration
Consult with
your ISP, if you are unsure.
 |
|
|
STEP 2: Change your
DIAL PLAN
Under the same
SIP tab, look for the PBX Phone Parameters
section and copy and paste the following Dial
Plan
(9,[3469]11S0|9,[2-9]xxxxxx|9,<:1>[2-9]xxxxxxxxxS0|9,1[2-9]xxxxxxxxxS0|9,011xx.|9,xx.|[1-8]xx)
to the “Phone
Dial Plan” as shown in the circled area in the graphics
below.
 |
|
|
STEP 3: LINE
configuration
The SPA 9000 has
4 VoIP lines which you can configure according to your
needs. Using Line 1 as an example to configure your
Globalink VoIP line and line answer pattern.
3.1
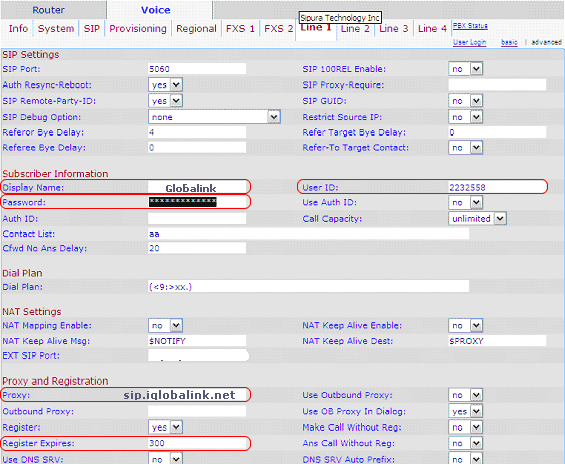
Configure Globalink VoIP line.
Enter your Globalink virtual number, password and proxy
settings. Change Register Expires to 300.
 |
|
3.2
Configure Line Answer pattern.
-
Auto Attendant - Calls will be answered by
the Auto Attendant.
-
Call Hunting - Calls will ring the
specified extensions sequentially.
-
Direct Call - Calls to a line will ring one
extension directly.
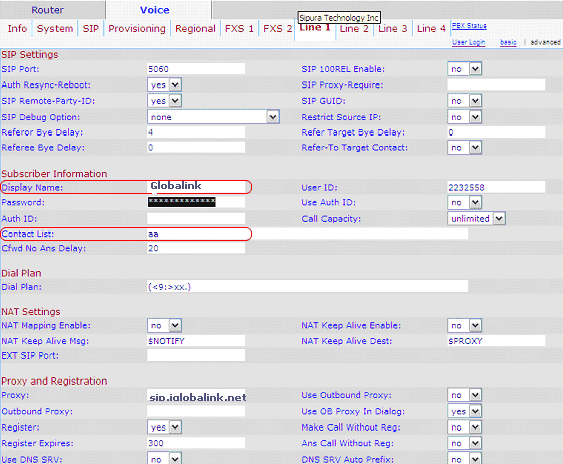
Auto
Attendant
(Contact List : aa)
In this case,
calls will be answered by the Auto Attendant.
Call
Hunting
(Contact List : 100,101,102,hunt=next;7;0,aa)
In this case, a
call will ring extensions 100, 101, and 102
sequentially. If the call is not answered then it will
be sent to the Auto Attendant.

Direct
Call
(Contact List : 100)
A call will ring
directly to extension 100.

Interoperability - SPA 941 IP Phone
Configuration guide to work with SPA 9000
Linksys SPA 941
IP Phone is designed to inter-operate with SPA 9000.
When a SPA 941 connects into the same Local Area Network
that a SPA 9000 resides, it will sync-up with it. You do
not need to configure either device for them to identify
each other. SPA 941 ships with 2 extensions and can be
upgraded to 4.
Step 1
After power-up, obtain the IP address of the SPA 941 by
pressing the MENU button on the phone

and the number 9 on the keypad.
Step 2
Enter the IP address of the SPA 941 in your browser,
click on the Admin and then, the Advanced link.
Step 3
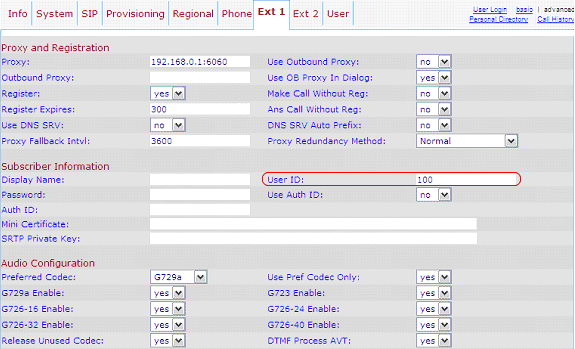
If this is the 1st SPA 941 connected to the LAN that the
SPA 9000 is connected, User ID of 100 is automatically
assigned by the SPA 9000 to this phone's EXT 1. You can
see this in the USER ID field of EXT 1. No password is
needed or assigned. If you connect a 2nd SPA 941 to the
network, EXT 1 of the 2nd SPA 941 will show 101 and so
on.
 |
|
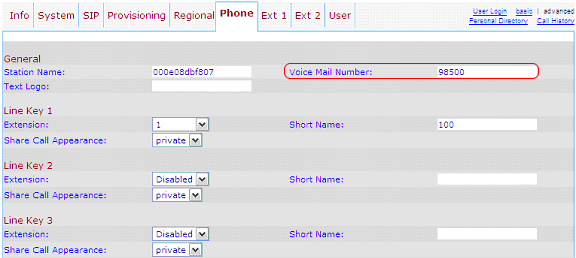
STEP 4: To allow voicemail access
Click on the
Phone tab. Enter 98500 in the Voicemail Field. This will
program the Voicemail button on the phone.
 |
|
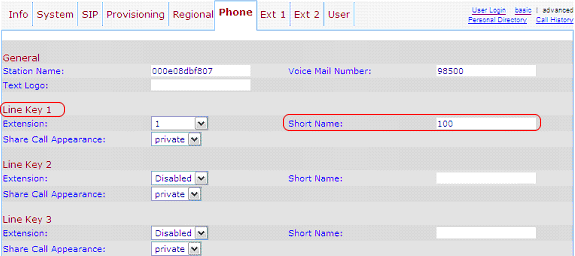
STEP 5: Line key setting for each of the line button on
the IP Phone
Line Key 1 to 4.
Select the extension number and enter a number or a
short name. In this example, we use 100. This will show
on the phone's LCD screen next to the respective button.
 |
|
STEP 6: To set your voicemail credentials, click on the
USER tab
This feature
allows you to greet caller with your own greetings when
you are unable to answer a call in your extension. You
will need to designate your Globalink Virtual Number (VN)
for each extension for voicemail. This VN “CANNOT” be
the same as the Globalink VNs used in LINES 1 to 4, in
the SPA 9000.
Enter your
Globalink VN in the following format 9,vm + VN
(9,vm1252566) Note: for 1252566 – use your own VN
instead.
 |
|
STEP 7
To make outside
calls, dial 9 and then the telephone number. To dial
another person's phone in the office, dial that person's
phone extension number such as 100. |
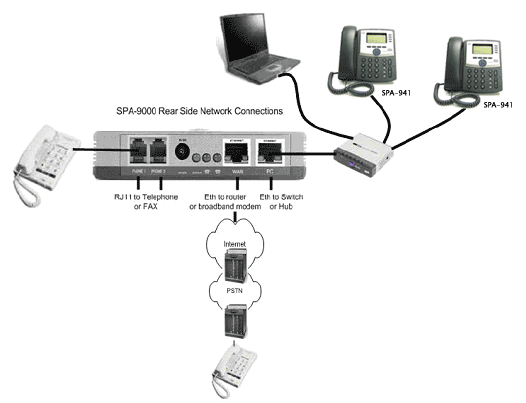
Diagram of Phone and Network
Connection
 |
Home
|Support|
Devices
|Setup
|DID
|FAQ
|Download |


